Initial Workspace
The initial workspace is the starting point for an OSDx examination. It provides access to the available tests, eye selection, acquisition controls, result areas, system messages and examination status indicators.
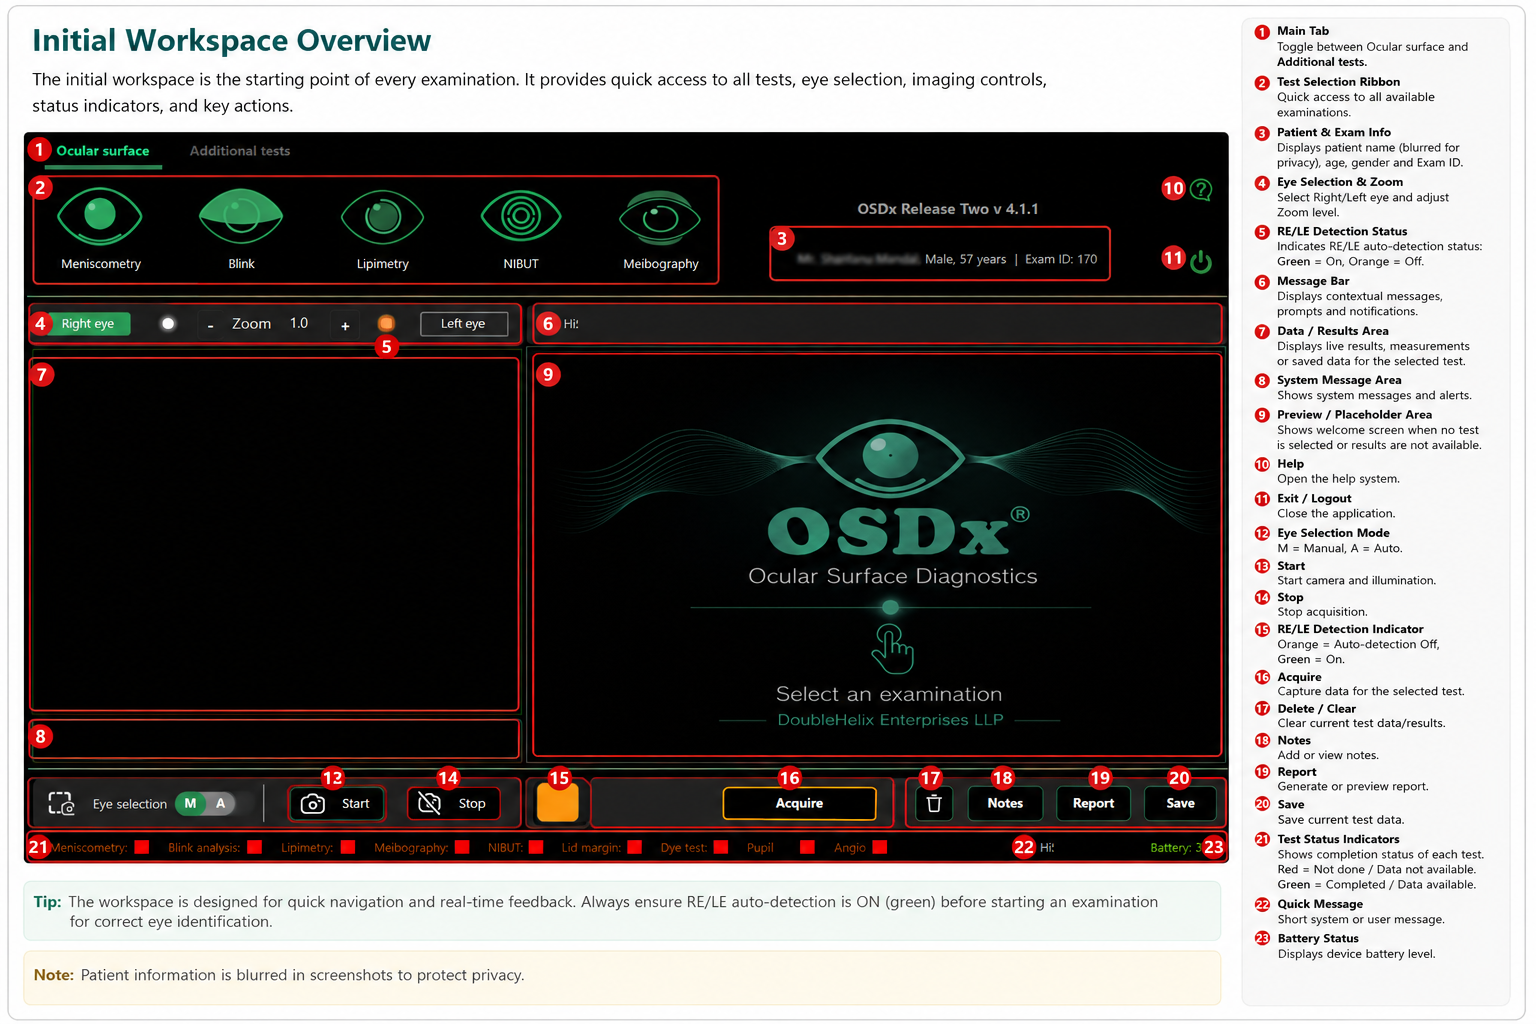
Workspace areas and controls
1Main tabs
Use Ocular surface and Additional tests to switch between groups of examinations. The currently selected tab is highlighted.
2Test selection ribbon
Select the examination to be performed. The visible Ocular Surface group includes Meniscometry, Blink, Lipimetry, NIBUT and Meibography. Additional examinations are available under the second tab.
3Patient and examination information
Displays the current patient details and Exam ID. Confirm that the correct patient and examination are open before acquiring or saving results.
4Eye selection and zoom
Shows the currently selected eye and provides controls for image zoom. The opposite-eye button can be used when manual eye selection is required.
5Upper RE/LE detection indicator
Indicates the current eye-detection state near the eye controls. The eye selected by the system should match the eye being examined.
6Context message area
Displays examination-specific prompts, guidance and status messages. Read this area while moving between tests because the message changes according to the active examination.
7Data / results area
Displays live measurements, processed information or previously saved results for the selected test. Its contents vary with the examination.
8System message area
Used for short system-level messages and notifications associated with the current workflow.
9Preview / examination display
The main display area shows live video, acquired images or processed examination data. Before a test is selected, it displays the OSDx welcome screen.
10Help
Opens the OSDx help system.
11Exit
Closes the OSDx application. Save required examination data before exiting.
12Eye selection mode
M selects manual eye selection. A enables automatic right-eye/left-eye detection. Automatic detection should normally be used when the device RE/LE detector is available.
13Start
Starts the camera and illumination for the selected examination. If a test has already been performed, Start can be used to begin a retake.
14Stop
Stops the active acquisition sequence, camera/illumination operation or examination workflow as applicable.
15RE/LE auto-detection status indicator
The square beside Acquire shows whether right-eye/left-eye automatic detection is active. Orange = auto-detection OFF. Green = auto-detection ON.
16Acquire
Performs the acquisition action for the currently selected examination. The exact action depends on the test, for example capturing an image or beginning the test-specific measurement.
17Delete / clear
Clears the current test data or results for the active examination. Use carefully because a retake may be required.
18Notes
Opens the notes function for adding or reviewing examination notes.
19Report
Opens the report workflow for reviewing or generating the examination report.
20Save
Saves the current examination data. Save status is tracked separately for each test.
21Test status indicators
The bottom status strip shows the current data status of each examination. It provides a quick overview of which tests have usable data available.
22Quick message area
Displays brief application or user-facing messages at the bottom of the workspace.
23Battery status
Displays the current OSDx device battery level. Check the battery before beginning a prolonged examination session.
Status colours
| Indicator | Meaning |
|---|---|
| Orange RE/LE square | Automatic right-eye/left-eye detection is OFF. |
| Green RE/LE square | Automatic right-eye/left-eye detection is ON. |
| Red test-status square | No usable data is currently available for that examination. |
| Green test-status square | Usable examination data is available for that test. |